
CB750 K Cafe Racer build – Post 1 (2 August 2021)

For those who don’t know the Honda CB750 K first coined the term Superbike over 50 years ago. It was originally revealed as a concept by Honda in the late 60’s and shortly after (in 1969 to be precise) full production bikes hit the dealer floors. They were an instant success and won countless accolades and races. They essentially blew the competition out of the water at the time. There is some serious history in this vintage of a bike and we’re fortunate that one of our clients brought this one in to our workshop for some attention.
The purists won’t agree with the direction for this build. But that hasn’t stopped us before. There are several reasons why this one won’t be a restoration, and lends itself to a custom build instead. Mainly, the fact that it has been modified in the past, although quite poorly.
The mission for this build is simple. Make it beautiful and functional, all before it’s 50th birthday. We’ll be modifying this one extensively and improving the performance of it considerably. But we’ll still retain that old-school nostalgic look that the CB750 K series bikes are renowned for.
CB750 K Cafe Racer build – Post 2 (16 August 2021)
Over the last two weeks we’ve been working on assessing the CB750K and how well it runs. This will determine whether it needs any serious work to the engine or not. We started the process by doing the fundamentals and checked / adjusted the valve tappet clearances, timing electrical (ignition coils, condensers, points etc.), and so on. The bike also returned very consistent compression readings of 130psi (+/- 5psi) across all cylinders. Not bad for a bike that is about turn 50.
If you’ve just purchased a new bike and are wondering what needs to be checked then take a look at our Tech Article 4 on Where to start when it just isn’t starting. With all the positive signs we needed to create a muffler insert so that we could hear the engine run (without losing our hearing). This took on our usual process of creating an insert that is also captured in our Tech Article 1 Part 2 on building your custom muffler insert. This is a 1972 bike an here in Australia that means a noise limit of 100 dB(A).
This bike was able to be started but was far from being able to idle on its own. We decided to get a set of new Mikuni RS34 Carbs for it to ensure it breathes a whole lot better and kick things off in the right direction when it comes to upgrading the performance. Check out a photo of them installed down below.

CB750 K Cafe Racer build – Post 3 (23 August 2021)
After getting the bike idling and ensuring it will have many years of high rpm we decided to move onto our first challenge for this build. That is, removing the rear wheel and replacing it with a modern one to increase traction and achieve a more modern sports look at the rear. We’ve opted to use a Ducati Monster rear-end with a 160mm wide tyre as the substitute. Fortunately the wheel directly fits within the rear swing-arm and all that is required is a) matching the existing 750K axle diameter to that of the Ducati, and b) aligning the front and rear sprockets.
Task a) is the easier of the two, and requires us to machine an axle sleeve to go over the 20mm CB750K axle. The sleeve will have a wall thickness of 2.5mm and bring the total effective diameter up to 25mm to suit the new wheel bearings. We’ll then need to centre the rear wheel and machine some axle spacers to keep it there. Here are some progress photos:


Task b) involves aligning the front and rear sprockets. Now that we’re using a wider wheel at the back the front sprocket no longer runs true to the rear. We’ve checked clearances between the swingarm, the frame and anything else that it could strike and fortunately the only thing required is to offset the front sprocket so its in line. We’re still looking at our options on how to do this, but the first step will probably involve printing one out to size. The other important consideration will be the chain size. We’ll need the front and rear sprockets to match up in size for the chain.
CB750 K Cafe Racer build – Post 4 (6 September 2021)
We’ve made further developments with the front sprocket in the last week or so and decided to test fit everything. Using our 3D printer we managed to print one to size to simulate the actual alignment between front and rear. Ducati sprockets with the same pitch diameter come in only a few select sizes so we’re going to match the front teeth to the rear. This will allow us to use a 525 chain that should be ample considering the power output of the CB750. In this setup we went with an 11mm offset. It’s likely that we’ll get this custom made by a local sprocket place that specialises in this kind of work.

We also managed to strip the bike further down and get started on some custom fabrication. First up we’re looking at getting rid of that massive oil can on the side of the frame. We’ll lean it up and place it directly behind the carbs that should a) prevent any debris from the rear wheel flicking into the carbs and fouling the filters, and b) removing some visual weight from underneath the riders seat. We know we can get similar oil cans online, but prefer our own style. This involved shaping the can to the profile of the frame and to add some style bead rolling the seen face. Still yet to do the internal plumbing but we’re getting there.

CB750 K Cafe Racer build – Post 5 (18 October 2021)
It’s been a while since we last updated this running blog, but a lot has happened since then. We’ve managed to do the internals of the custom oil can and essentially copy and paste the internal plumping so it would operate in the exact same way. Check out the photo below:

We also managed to get the new front-end on using our Honda Fork Conversion Kit. In this build we’re using Honda 2001 CBR 929 forks, and a front wheel. It should match nicely with the tri-spoke rear wheel to make it all look as original as possible. Keep in mind that if you’re interested in doing the same and forks with a 50mm to diameter and 53-56mm bottom diameter will fit right up with our kits. The kit is also designed to be plug and play.

Most recently we started work on the electrical pan and determining where the components will be fitted. The pan should have ample space to house all components such as the lithium battery, reg/rec, motogadget m.unit blue, starter solenoid, and the motogadget m.lock. Here’s a photo!
Next up will be doing the wiring diagram specific to this build. We’ll be posting it here as well to the dedicated wiring diagram section on the website.

CB750 K Cafe Racer build – Post 6 (21 December 2021)
We’re getting incredibly busy in the workshop as we head into the new year. This has affected our ability to update the blogs despite extensive work being made on the builds. For the CB750K we’ve made some significant progress that is worth sharing. In consistency with the last post we developed a custom wiring diagram that we’ll use for the build. It hasn’t been tested yet, but should be at least 95% accurate (we’re still exploring ideas for some other components). The wiring diagram can be found in the Wiring Diagrams section of the blogs.
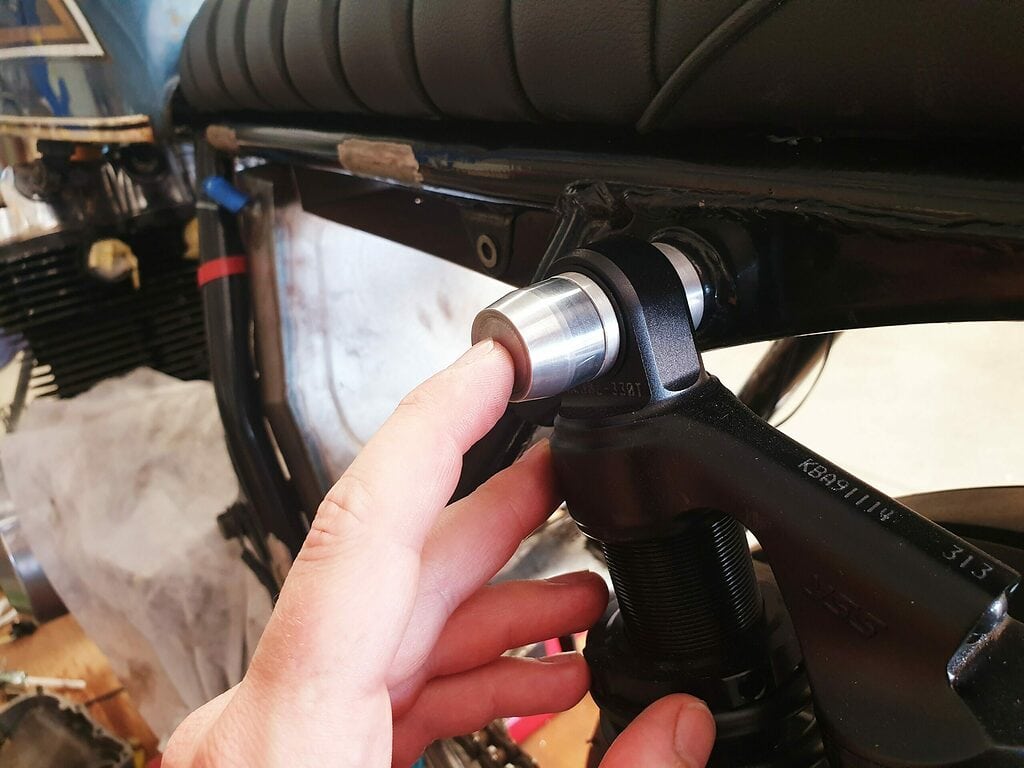
In other work we managed to get a set of our stocked YSS Shocks on the bike. To improve the look of the overall installation we went to the lathe to fabricate some bolt covers for the top and bottom. Covering unsightly and irregular lines caused by studs and bolts is something we always look to do. Check it out:
We took it one step further by using the lathe to machine up a custom crankcase breather. This was a 3 part design consisting of main body, compression plate, and gauze filter (fixed by the top compression plate and 5 3mm bolts). It’s hard see it with the tank on, most will overlook it entirely, but we know it’s there, looking pretty!

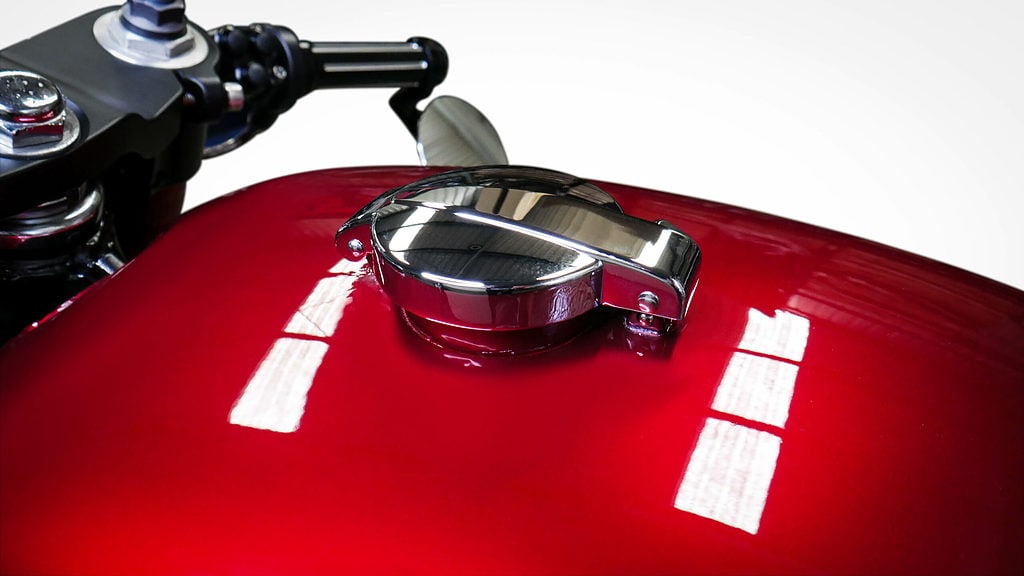
Speaking of the tank, you may find the colour familiar to our previous Honda build. The client loved the colour so much that he decided to go ahead with it, but with a shade deeper. Whilst painting candy colours can be a bit of pain due to the work required (lots of prep, undercoat, basecoat, and consistent flow out of the gun for the final finish) it really does add a touch of nostalgia to a retro-mod build.

CB750 K Cafe Racer build – Post 7 (17 January 2022)
We’ve had a little break over the Christmas and New Year break, but are back at it now. When we say little break, it still means we got in the workshop every now and then to work on the odd job and fulfill orders – Bike building never really sleeps.
The main work that the CB750K saw was a freshly painted engine, a sorting out of stainless steel bolts to clean it all up nicely, and some minor fabrication work with regard to the kick-start lever. Check out the photos below:


With electric starting available, we don’t expect the kick-starter to ever get any use, which made it even more appropriate to remove that old and ugly looking rubber and replace it with a custom machined alloy cover. You’ll notice that we’ve kept the same theme across the suspension covers, the crankcase breather and so on, except here we added a knurl for some grip – just in case.
CB750 K Cafe Racer build – Post 8 ( 27 March 2022)
This blog hasn’t gone entirely to plan. It’s 8 posts in, with months between posts. For all those keeping a close eye, we’re sorry but it’s been difficult keeping track of the many jobs we have in the workshop at the moment, and even more so writing consistently on all of our media avenues. If you’ve been keeping upto date on Instagram, you’ll notice that this build has now been completed. So to speed things up, we’ll go through it in the photos below.


CB750 K Cafe Racer build – Post 9 ( 28 March 2022)
To close off this build – despite the trouble in posting regularly, we’re sharing the latest feature article on the Pipeburn website. Be sure to check it out [here] : https://pipeburn.com/honda-cb750-jax/
Also, here are some photos of the shoot.


respectfully, you may want to look at moving that R/R from under the seat to where it can get some airflow. They produce heat as they operate and need at least some airflow over the cooling fins or the life of the R/R will be shorter than expected.
We agree with the general principle behind this so you’re definitely correct in commenting, and where possible we usually install the Regulator Rectifiers in areas where airflow is provided. Although in this case we haven’t done so because we felt the space around it, and the mounting plate will provide an addition heat-sink source. Whilst saying that, we haven’t done any testing on how much airflow or cooling they need. There are some bikes where the Reg/Recs are positioned by the OEM in areas where it is cramped, hot, and lacking any sort of cooling, so it’d be interesting to see what testing-if any has been done. It may be something that we do in the future, potentially adding a thermocouple to track the temperature of a Reg/Rec during operation. If we get the time we could trial it between two positions and see what data we get – may be a future article that we write up. Thanks for your time in writing up a comment and contributing to this discussion, it’s greatly appreciated George.