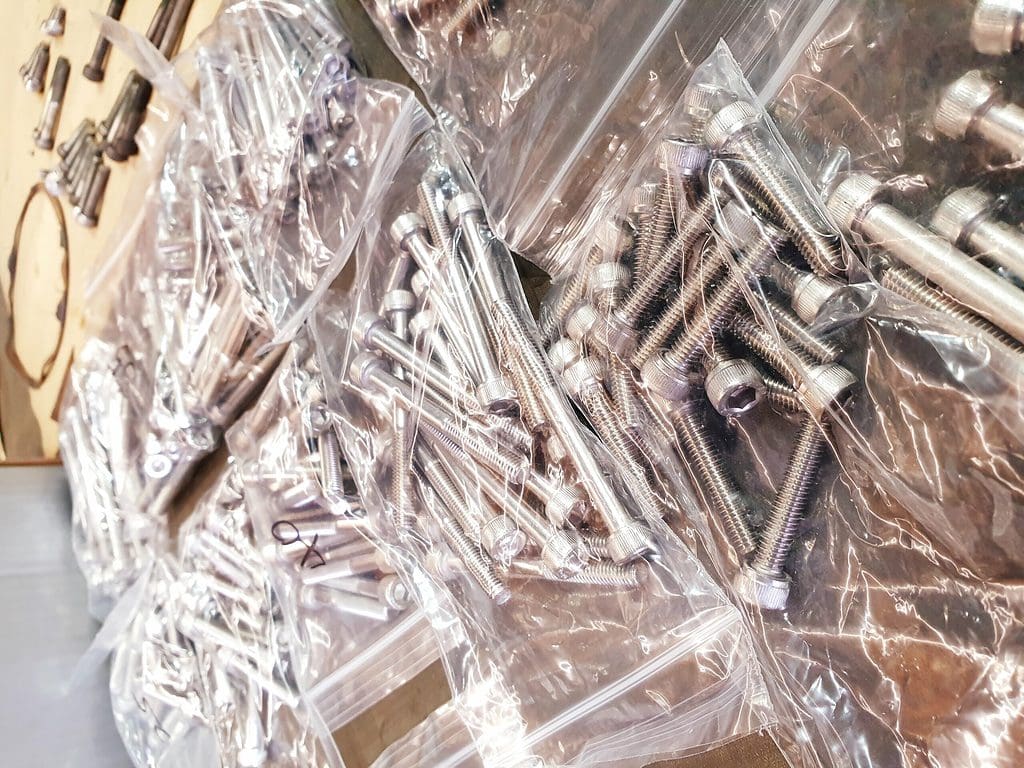
There seem to be a countless number of bolt types and finding one that suits a particular task should be pretty straightforward. But just when you think you can’t go wrong, you quickly find yourself in a mess where it doesn’t look quite right.
Here’s a quick guide on everything you should know about nuts, bolts, washers, lubricants, thread lockers, and the importance of torque. It takes into account aesthetics, and the fundamentals of using the correctly rated bolts, with the correct washer and nut for the task.
So as you start a custom motorcycle build, restoration, café racer and so on, you’ll have a good understanding of what goes where, and why. Put it simply, use it as a cheat sheet that covers 95% of what you will encounter on a typical build – for the other 5% due diligence and research may be required.
Enjoy!
Common Fastener Types:
Refer to the diagram below to familiarise yourself with hex bolts, socket screws and machine screws because you’ll be seeing and using a lot of them – we’ll elaborate on them and their types further below.
You’ll notice that we added in shoulder bolts because we rarely see these despite their importance. Often we see standard hex bolts or socket screws used in place where shoulder bolts should be used. These are very different in that shoulder bolts are designed with a specific diameter to allow for a suitable pivot surface. Put is simply, source and use this appropriately and any pivot point such as those found in gear linkages or your shock absorbers and your bike will thank you in the long run.
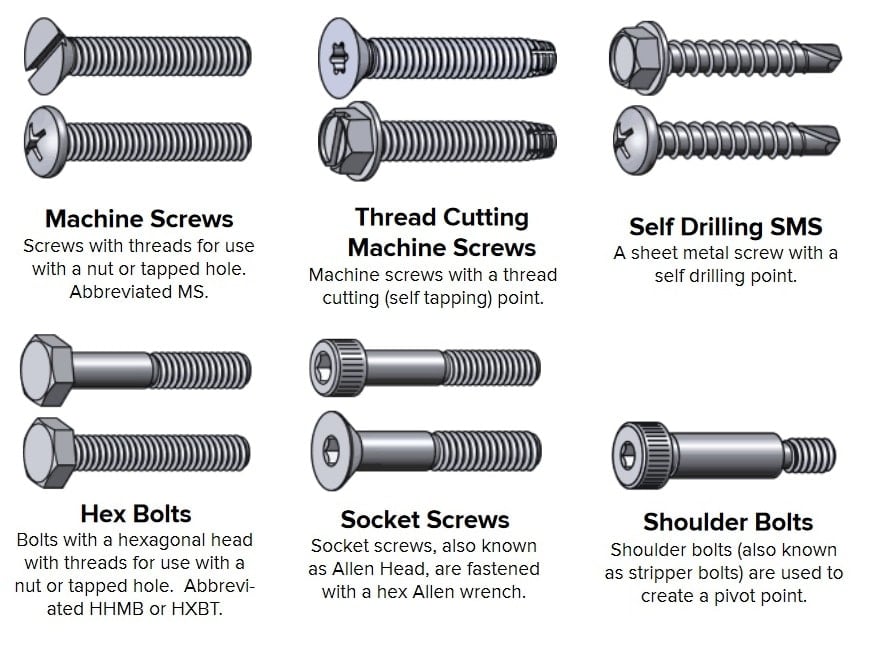
Thread cutting or self-drilling screws should be kept to a minimum or completely avoided – We only use these where we can’t use one of the above mentioned bolts or where we can’t conveniently get a tap to make a suitable thread; however, this rarely happens. A lot of bikes roll into our workshop with too many of these. They may seem like an option, but they’re often weak (both in clamping force and shear strength) and too long for the task, which depending on their location can be a hazard to you, or a future recipe for disaster if close to electrical wiring.
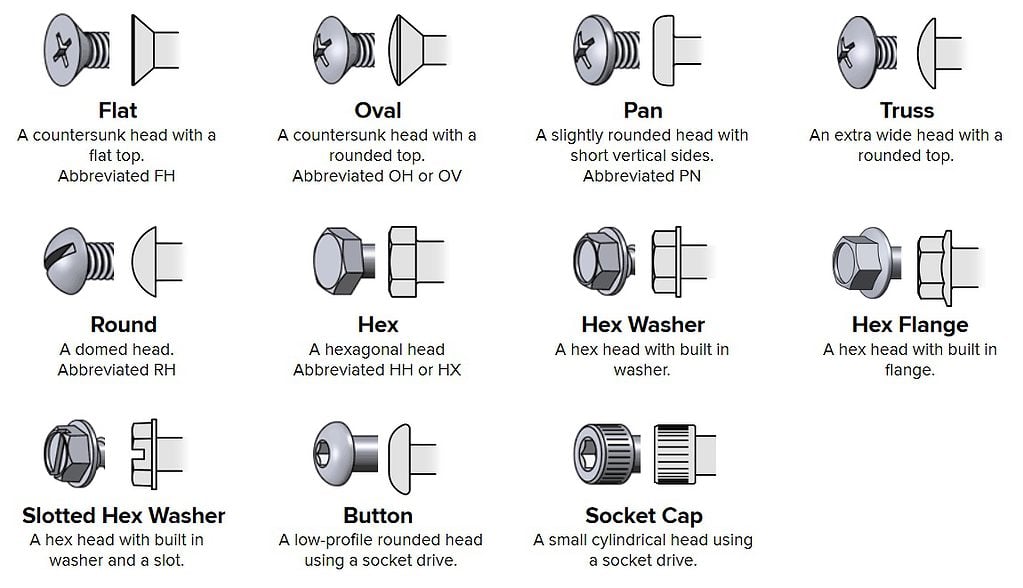
Common head types are shown in the diagram below. Frame and engine bolts typically use socket cap head bolts or standard hex bolts. They’re also usually high tensile steel and 12mm in size. If they come with a washer, it’s best to use the washer because it distributes the clamping load across a larger area, or you can replace the two part installation with a single hex washer bolt and a nut with a flange. Just be sure the bolts are equivalent in strength.
We typically use hex washer bolts and socket cap heads on our front-end as well (That is our fork conversion kits and the brake callipers etc.). One of the things to keep in mind with these bolts is that they’re easily seen because of their high profile. If you choose a nice finish, this can add to the look.
A flat head, pan head or a button head bolt can be used in areas where subtlety is best. This means under electrical trays or mounting up miscellaneous components that are intended to be low profile or completely hidden. Keep in mind though that heads with a low profile will not have the same clamping strength as the hex, hex washer or socket cap head counterparts. Use the low profile heads for items that don’t need the strength.
Size, strength and finishes:
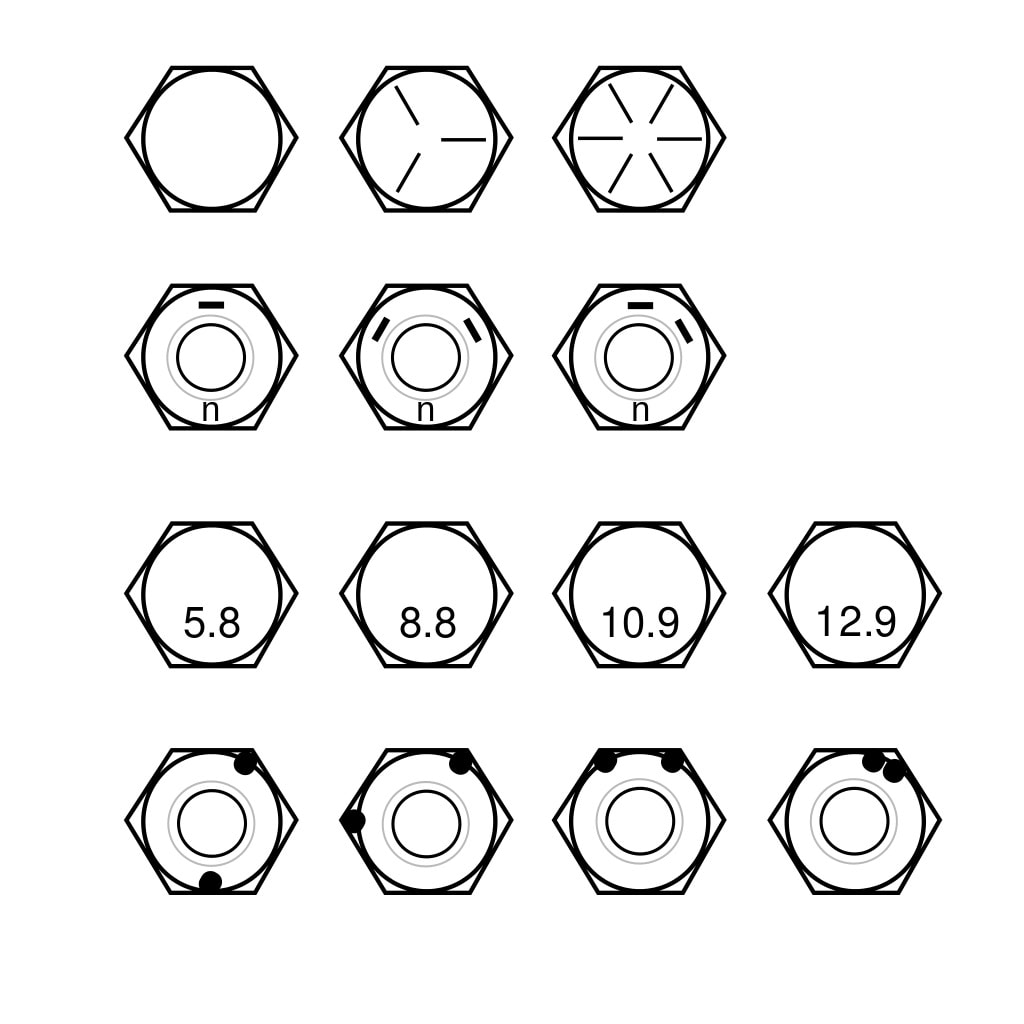
Below is a strength diagram for different grade bolts and their markings. Class 8.8 bolts are considered high tensile and should be used for all frame and engine bolts. Components such as the braking system, front-ends and the rear shocks should use the equivalent or close to this. Mild steel or medium tensile (class 5.8) bolts are not suitable.
The bolt markings tell us the material properties. For example class 8.8 tells us that the bolt has an ultimate tensile strength (UTS) of 800MPa and the yield strength is 80% of the UTS. For a class 10.9 bolt, that means 1000MPa and 90% Yield.
Note that Class 8.8 is a metric class marking. It is equivalent to the imperial grade 5 bolt. Class 10.9 is then equivalent to grade 8 imperial. We know – Metric v Imperial can be a bit can confusing so when you’re in doubt, check the head and refer to the chart below. If there is no marking then assume it is medium tensile or mild steel, or better yet get your bolts from a reputable source and ask them what class/grade they are.
You may be thinking that you’re safe if you simply opt with stainless steel bolts. They’re stronger and more expensive. However, once again it depends on the application and no two bolts are the same. The typical stainless steel classes are A2-50, A2-70, and A2-80. These have a UTS of 500MPa, 700MPa, and 800MPa respectively. Using A2-50 stainless steel bolts are not suitable for the frame, brake and suspensions components are considered equivalent to the medium tensile bolts. A2-70 and higher will provide you with a suitable high tensile equivalent.
The other advantage is that stainless steel bolts are unlike carbon steel (standard bolts) in that the main alloy is chromium and therefore achieve high corrosion resistance and don’t require any coatings. If you’re reusing your old bolts that are bit worn and experienced 40+ years of environmental degradation then it’s worth either changing them or collecting and sending them to be zinc plated. The most common zinc plating colour is black. Alternatively, you can paint your bolts, but there is a risk the paint with flake or chip during the re-installation phase of the build. Using a thin cloth or masking tape can be useful in protecting the bolt.
If you’re replacing all the bolts on a cover, frame etc. then you can measure the original bolts and order those sizes specifically. Remember that a bolt is measured from the bottom flange of the head to end of the thread (its effective length – less the head). If you don’t know the required length then you can do a simple check by measuring the length of the hole and adding 8-10mm to it. This will provide up to 10mm of threads to engage with, and for bolts ranging from M6 to M10 is ample. M12 and above may require more threads to provide suitable clamping force.
Nuts and washers:
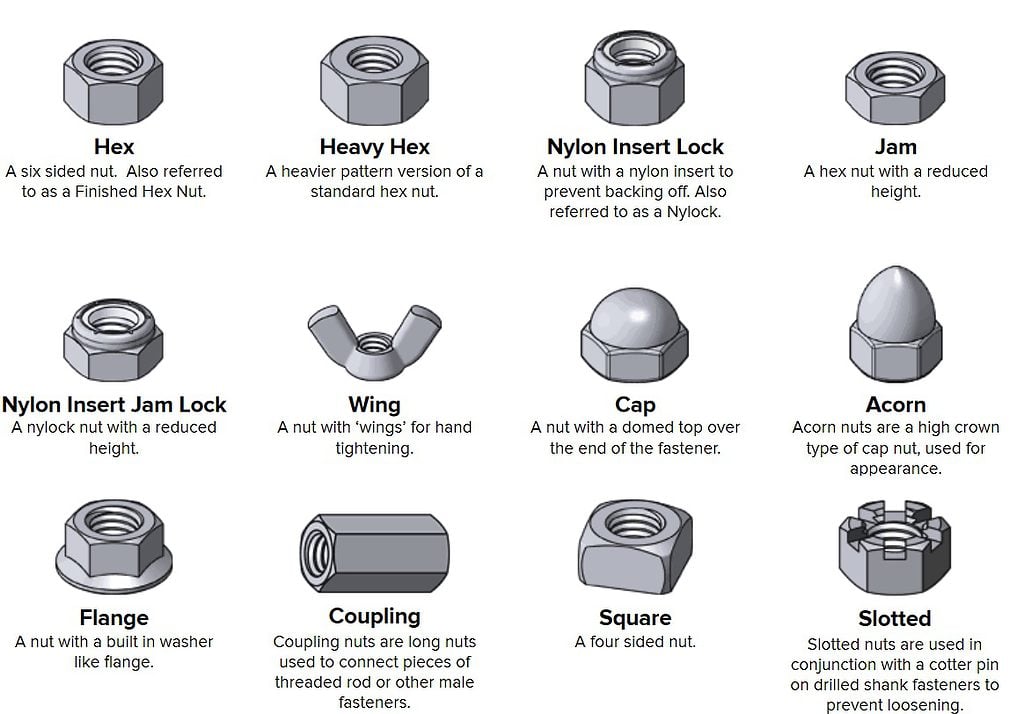
Refer to the diagram below for common nuts used and their applications. When it comes to nuts, they’re pretty self-explanatory – use the ones that are most appropriate to your installation. Aside from that, most builders love Nylocs. They’re cheap insurance against coming undone after many hours on the road, and we recommend using them everywhere. It’s important to consider that Nylocs are single use only. After installed, and over time the nylon insert breaks away and crushes and no longer provides the pressure necessary to prevent the bolt from backing out, so if you’re disassembling a Nyloc after some time – trash it.
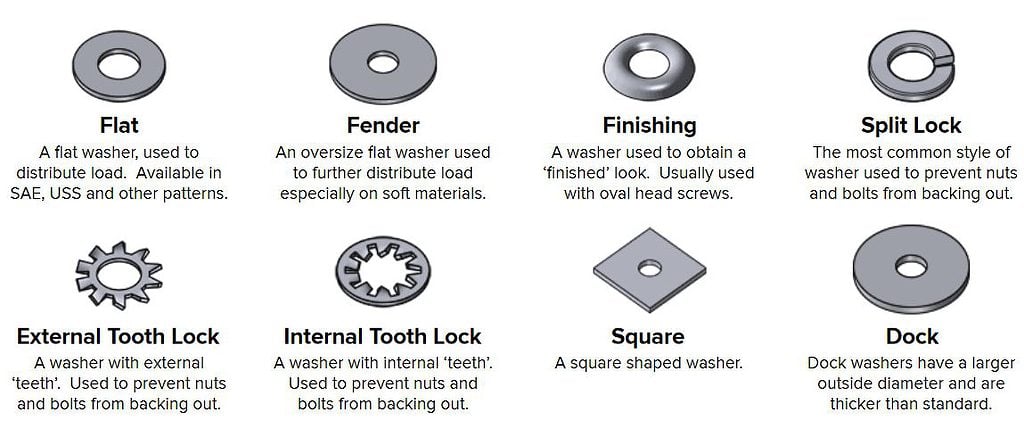
Where to use flat washers? Unless you’re using a bolt and nut with a flange or built-in washer you should be using washers anywhere there is; high clamping load required (e.g. frame bolts), a dissimilar material, or there is an oversize hole or the surface may not be 100% truly flat. A flat washer will distribute the clamping load across a wider area, ensuring the bolt does its job effectively.
Split lock or toothed washers are intended to prevent the bolt from backing out. If you’re using a nyloc nut then this isn’t necessary. If the part you’re installing goes into a tapped hole and securing a component that is subject to vibrations then it’s a good idea to use one of these to reduce the chances of the fixtures coming undone.
So when in doubt don’t overthink it, use a washer. We often tear down bikes and see a lack of suitable washers being used.
Source: https://www.boltdepot.com/fastener-information/printable-tools/type-chart.pdf
Thread pitches and threaded inserts:
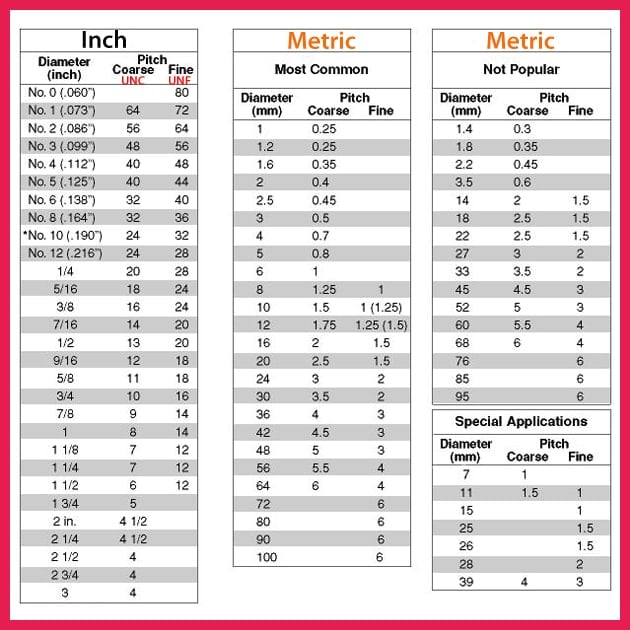
Refer to the chart below for a comparison between imperial and metric thread pitch sizes. The vast majority of the world uses the metric system and so do we. If you ever need to convert something, refer to the below chart or simply google it.
No need to go into any serious theory in this section other than to say that you should print out the charts in this section (or their Imperial equivalents) and have them handy in your workshop or garage. It is more likely than not that you will need to drill and tap a hole somewhere on your bike, a component, or use a die to make a custom fixture at some point during your build.
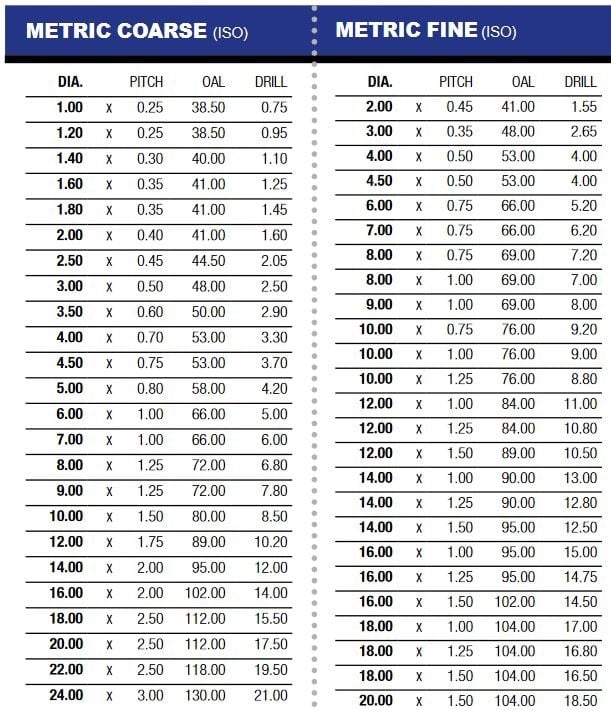
Most bikes are old (in some cases very old) and they’ve probably had a very remarkable journey throughout their life. It’s likely they’ve been dropped, bolts have been sheared, and threads have been stripped. You will need to fix these minor inconveniences at some stage at the very least. If you’re doing a tonne of custom work, then a tap and die kit will be your miracle worker! Below is a metric tap and die chart. You want the right size diameter hole before you start tapping a thread into any bit of metal. Ideally you want to step it through by using a starter, intermediate and finishing tap. Don’t forget to take your time doing any sort of threads – often you only get one shot so be sure it’s perfectly aligned and take your time. It’s recommended to use some cutting oil when using any tape or die.
In some cases an oversized hole and a threaded insert/helicoil is necessary. This usually happens when you need to repair a stripped hole, or are mounting a component that requires high clamping force but is a softer material (e.g. aluminium components such as sub-frame mounts or rotor adapters). The threaded insert provides two primary benefits; repairing a damaged thread, and being stronger than the original as they provide a more uniform distribution of pressure in the threaded bore.
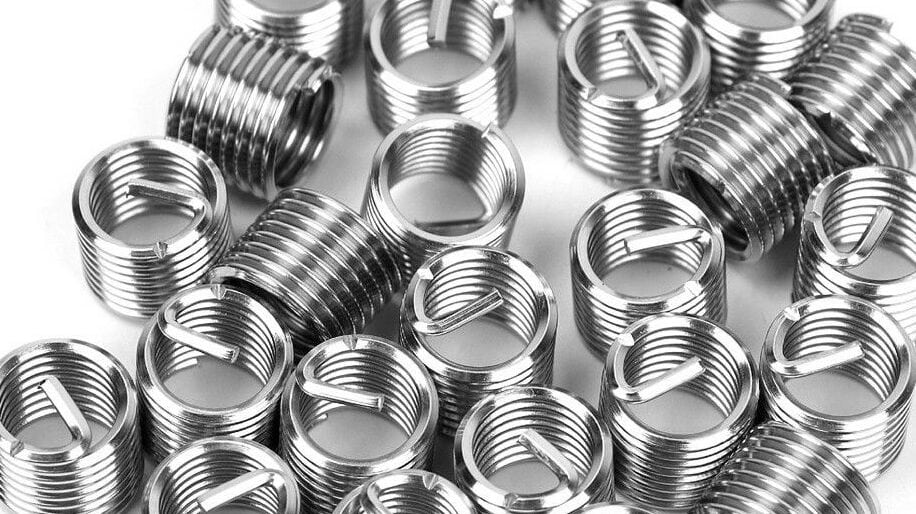
Below is a metric threaded insert chart for thin wall inserts. It shows the required hole and thread to accommodate the insert. Note that the depending on the manufacturer this may differ so be sure to follow the instructions on the kit that you purchase. A thread repair kit will often have several pieces to it including the required drill bit and tap.

Torque settings and lubrication:
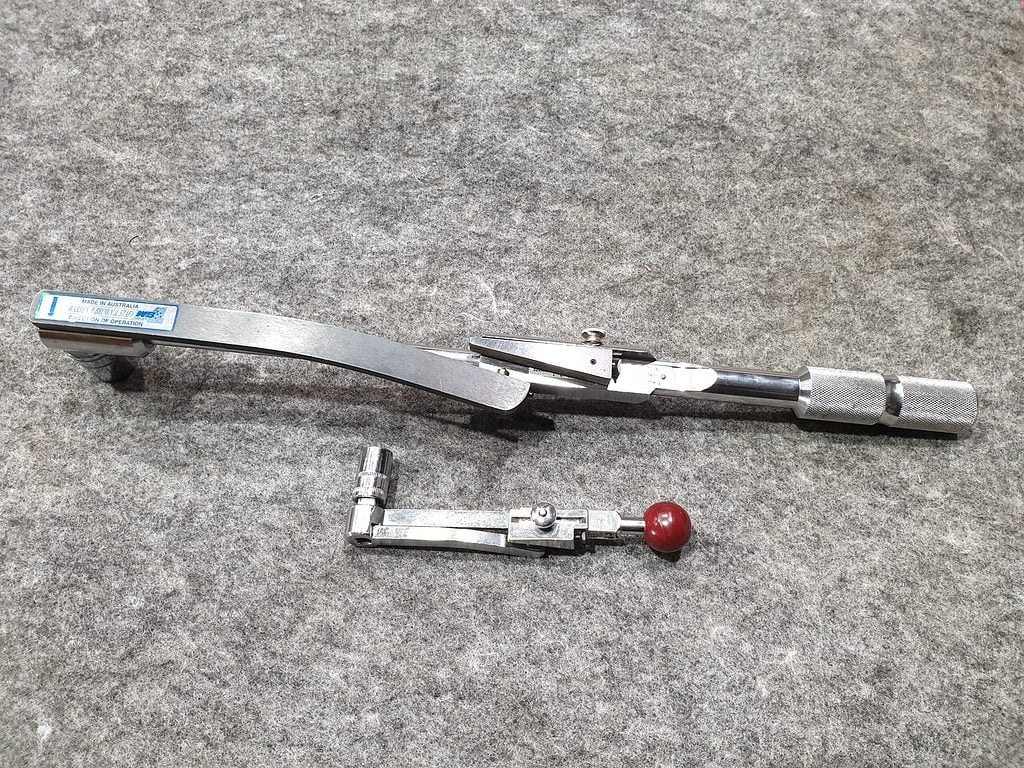
Torque settings are crucial. The simple wisdom here is to refer to your installation guide or your workshop manual on how to adequately torque your bolts. A lack of torque will provide insufficient clamping force and could result in loosening of a component or a leak depending where the bolt is located. Furthermore, for the bolt to work and stay fixed it requires a specific amount of preload that will be achieved by the correct torque being applied. There are some areas where you really don’t want bolts to come loose and these are typically the safety critical components like the brakes or suspension components. So do your research on the required torque settings and if you haven’t already got one get yourself a good quality torque wrench. We have two that we use regularly – one for small bolts and one for big bolts!
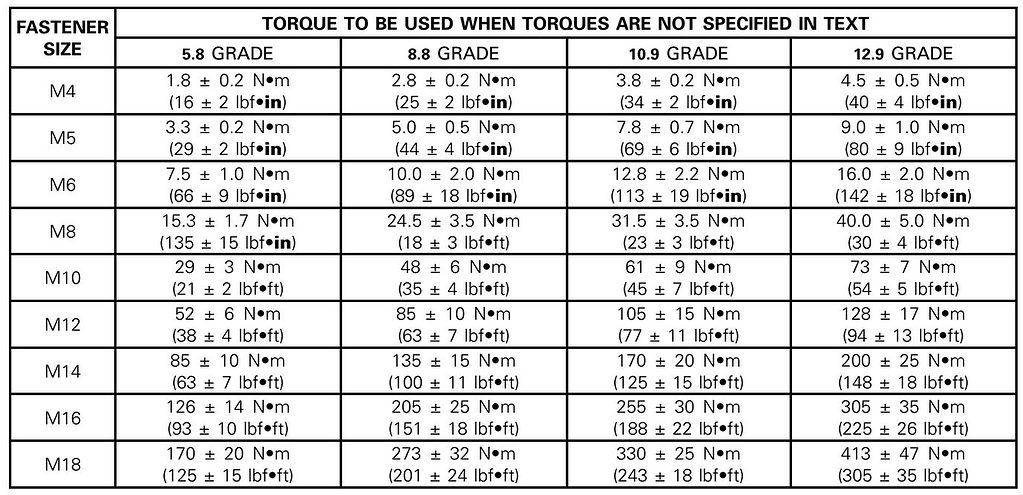
If you’ve done the research but are unable to find any suitable torque values then refer to the chart below. It shows common torque values for fasteners of different size and strength. These values are approximated between wet and dry installations (we’ve compared the values to other dry and wet charts). Typically a lubricated bolt requires a little bit less torque because there is less friction at the initial stages of turning to overcome. We recommend always lubricating your bolts to ensure proper assembly.
The other obvious reason for knowing the torque values or having a guide to use is that you want to avoid stripping the thread or snapping a bolt. Either of these scenarios can spell disaster and at the best case result in more time doing unnecessary work.
Know when to use lubricants and thread-lockers.
As mentioned earlier we recommend some sort of lubricant for each bolt to achieve the correct torque rating. For engine mounting bolts, covers, axles, shafts or anything related to pushing up against a bearing point use an oil or an anti-seize paste. This will ensure the bolt threads seat properly without binding and the correct torque is applied during installation. This will also make it easier to disassemble items for servicing or changing in months or years to come.
For components that experience vibrations and are not coming off for the foreseeable future use a medium strength thread locker (everyone’s heard of Loctite). The thread locker is designed to dry up between the threads and prevent them from backing out (similar to a Nyloc nut). They also provide the lubrication to allow for a smooth and uniform assembly. Common items include brake disc bolts or pinch bolts that experience high torque forces.
So there you have it – all you need to know about bolts, nuts, washers and more!
Where to from here?
This guide will cover 95% of the information you will need to know to safely and effectively to assembly any component on your bike project. But we haven’t covered everything and there is a wealth of information out on the internet when it comes to bolts, nuts, installation practices and the theory behind torque and preload forces. If you’re interested in more information then google is your best friend, otherwise, feel free to get in touch with us by using one of our contact forms on our site.

